Kitchener stitch is one of those things that tends to make some knitters nervous. No need to be nervous!! If you’re really concerned that you will mess up, then put a lifeline in the row you will graft, or the row below. That way you can always undo what you did and do it over again. 🙂
Most Kitchener stitch tutorials assume that you have stockinette to graft, and that is the most common occurrence – sock toes especially. So they give instructions to ‘Knit on, purl off. Purl on, knit off.” But what if you have something other than stockinette? That won’t work if you have a rib, or some combination of knits and purls instead of plain stockinette. I ran into that situation a while ago – I wanted to graft a hood on a sweater, and it had cables on the sides, with purls framing the cables, and stockinette on the rest of the hood. I researched, and came across a different set of instructions : “Same off, Opposite on.” Now, I always use this ‘mantra’, if you will, to work my Kitchener stitch. And I know no matter what stitch pattern I have I will be able to graft it using this.
(One caveat: If your grafting row needs to look different from the work below, then this will not work. For example, seed stitch – where every row is different from the other. This would produce a row identical to the row below, NOT maintaining the seed stitch across the graft. Keep that in mind.)
Kitchener stitch is just a fancy name for a sewn graft. You are essentially working a row of duplicate stitch between two opposing live rows. It gets a bit confusing and intimidating because instead of the work flat in front of you, you have half the knitting (the right side) in the front, and half the knitting (the wrong side) in the back.
Until you get more confident (and even once you’re pretty good at it!) I suggest locking yourself away in a quiet room with no distractions to work Kitchener stitch, and DO NOT stop in the middle, or you may lose your place!
Cut your working yarn a good 3-4 times longer than you think you need. Then thread it on a tapestry needle.
I will start with some photos showing the steps, and at the end of this post I will have two videos showing the process. (You can skip down to the videos first if you’d like!) 🙂
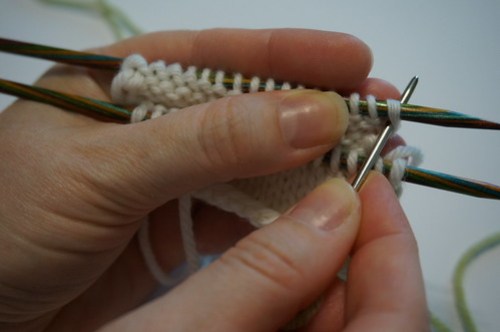
Knitting ready to graft:

Working yarn threaded on needle and ready to go (shown in contrast yarn.):

In this case my yarn is coming from the front needle. When you’re knitting in the round, your yarn will be coming from the back needle instead. Doesn’t matter! Just start with the front needle instead of the back needle.
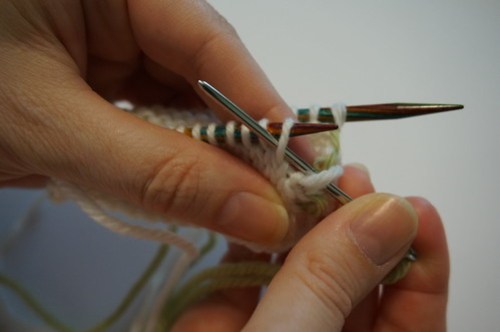
The first step is to work an “Opposite On” stitch on the needle that does NOT have the working yarn.
In this case the stitch is a purl, so put the needle into the stitch as if to knit and leave the stitch on the knitting needle.
Now we need to work an “Opposite On” on the front needle.

This is a knit stitch, so put the tapestry needle through the stitch as if to purl.
Pull the yarn through, but do not pull it tight. We will fix the tension after everything is done. BE SURE to keep the working thread UNDER the knitting needles. This is very important. If you don’t you will have a big mess.
Now we’re ready to start working the stitches off the needle. We last did the front needle, so move to the back needle and begin working the pair of instructions : “Same Off, Opposite On”.

Our back stitch is a purl, so to “Same Off” purl this stitch and pull it off the needle. Before you do anything else, work an “Opposite On”: knit the next stitch (because it is a purl) and leave it on the needle.

Now pull your working yarn through, but not too tight.
Move to the front needle, and repeat the process, this time with your knit stitches.
First, “Same Off” – so knit the stitch and pull it off the needle.

Now “Opposite On”, so purl the next stitch and leave it on the needle.
Pull your yarn through, but not too tight.

You’ll continue across until you get to your last stitch on each needle. You will work the “Same Off” step on each needle, but not the “on” step (since you have no more stitches on the needle!). You’re almost done!
Now, we need to fix the tension across the row so it looks neat. Starting at the end where you started grafting, pull each individual stitch, one side at a time, until you get a stitch that matches the tension in the rest of the knitting. Slowly work your way across the row until you get to the end. Weave in your ends and you’re done!


Now, for something other than stockinette stitch, you do the EXACT SAME steps! As long as you pay attention to what kind of stitch is currently facing you, and remember to work “Same Off” or “Opposite On”, then you can graft any combination of knits and purls! Here is a knit and purl rib piece after grafting:

If you’re still confused, I made a couple of videos that might make it more clear. I walk you through grafting stockinette stitch, and then grafting the rib in the photo above.
[youtube=http://youtu.be/xR3LXlBkrvw]
[youtube=http://youtu.be/Rj5v5gzyCfk]
(I apologize – the second video is a bit blurry in spots, but hopefully you can see well enough to see what I’m doing!)
Another thing to keep in mind is that grafting always offsets the two knitted pieces by a half stitch. This is because you have the tops of the knits facing each other, and you have to carry a column of knit stitches up into the space between two upside down knits on the opposite piece. If you look closely at the rib photo above, you can see what I mean. Try to graft in an inconspicuous place if you have a pattern other than stockinette- if the offset bothers you. Most people won’t notice it, however. 🙂
I hope this was helpful! Let me know if anything is still unclear, and feel free to add your questions or comments below!
Happy Knitting!
YOU TAUGHT ME THINGS!
lol! 😀
The best tutorial on Kitchener ever !!! Thanks so much for your thorough and simple instruction 🙂
Oh thank you for your kind words! You’re welcome!
Thank you for your clear and detailed explanation! I finally feel like I understand Kitchener.
You’re welcome!